Saturday, January 27, 2007

Planning for the Master Bath


Well, I've put it off long enough. It's time to start the master bath. I have put this project on the back burner because we just finished a major kitchen over-haul, and I just couldn't bring myself to start another large scale project. The tub was refinished and has been sitting in our "sitting room" since before Christmas. We use it to store clean clothes. I have been doing some research and found a nice source for vintage plumbing components. I'm thinking if the budget will allow it, I'll get a free standing cast shower. I had considered building a steam shower, but at this point I just want to take the path of least resistance, and this really seems to suit the style I'm going for. I think we will stick with the oil rubbed bronze finish that we used in the kitchen. I'm also considering a 5" ebony maple engineered flooring product. It's easier to just start with a clean slate. The pine tongue-n-groove is nice, but there are a few walls that need to come down and the flooring that is installed now is not contiguous. I think we'll start methodically with the sawzall, remove the two interior walls that make up the closet, remove the baseboards and trim, and cut the old shower enclosure out. I need to plan it properly so that we have minimal shower downtime, since the other bathroom only has the clawfoot tub. I'll be sure to take a good series of before, during, and after photos.

Thursday, January 25, 2007

Top Ten Do-it-yourself mistakes...

As posted on MSN today, here is a list of the top ten errors do it yourself-ers make, and I've made just about every one of them. My personal favorite? Number two, Starting a job without the necessary tools and supplies. This is clearly one of the most time consuming mistakes that I have made. Unfortunately, I tend to make this one a lot. When we put the bathroom in our office, my father suggested that we shouldn't worry about busting up all of that concrete to install the waste line, but that we should build a throne for the throne instead. It's a six inch diameter waste line, which meant we would have had to build up the floor with 2x8's. We mocked it up and sat the toilet on it, but it just looked absurd. The Jolly Green Giant would have needed a step ladder to use it. The point? I spent a few hours actually considering that ridiculous alternative. The problem and original aversion to breaking up the concrete stemmed from the fact that we had indeed drilled a few holes in it, whacked it a few times with the mini sledge and cold chisel, and finally decided that we would sooner chisel out of Alcatraz than chisel out a home for my drain. I broke down and went to the local rental shop. I explained what I was trying to do, and for thirty dollars and a refundable $100 credit card deposit, I got a mini jack hammer/drill. It took all of thirty minutes to trench out a path in the concrete for the new drain with the correct tool. Thirty minutes. Thirty dollars. Tool rental works well because most homeowners will never need a fifty gallon concrete mixer more than once. So don't hesitate to rent those specialty items that may just save you some serious time and help you to complete the task sooner. If you're planning on fencing your back yard, rent the auger for your post holes. (21 post by hand = 1.5 days, 21 post with auger = 2 hours with beer breaks in between). This is what separates weekend warriors from the Pros.

Wednesday, January 24, 2007

No, Wait... This is my new favorite toy....


I really have to get one of these...Its a usb pole dancer. The guy in the cube across from me has a usb foam missle launcher. It comes with software that allows the operator to rotate and aim the missle launcher in 360 degrees. Once on target, you can fire away. And they think blogging is a waste of company resources....

Go straight to the mammal...

If you're anything like me, you HATE automated phone directories..."press one to piss off" A few months ago I purchased plane tickets online, but unfortunately had to call Delta when a problem arose with my flight. After fumbling around on Delta's stupid touch-tone customer service auto-pilot, I was finally put through to "hajji" who, incidentally, claimed his name was "Steve". I was frustrated and a just a little short with Steve. I asked for, as President Bush would say, a "merican". Reluctantly, and as if I had publicly flogged him, hajji connected me to my 'merican customer service representative in good ole Atlanta, GA, just as I requested. But now there's help....gethuman.com provides a list of touch-tone short cuts that get you straight through to the operator. No more telephone purgatory. When you need a problem-solving human on the other end of the phone, try these numbers and their short cuts. This is the best list I've seen for popular 800 numbers with real live humans at the other end, many of them 'mericans too. Even better are the voice mail short cuts for each number that take you to the warm brain on the other end the quickest. The list is searchable with cntrl-F, cheers!

Tuesday, January 23, 2007

My new favorite tool.

Flexible Drill Bits

Flexible drill bits are made for drilling in the wall cavity and are a real lifesaver for remoldelers, and with good reason. Apparently, they're very popular with alarm installers too. For about fifty dollars you can save yourself a whole lot of time and hastle, and after all...isn't that what its all about? Over the weekend I was under the house trying to drill a hole up through the bottom sill of an interior wall to run a phone wire. Sure, I could have tacked it along the base board, but that's just, well...tacky. I cut holes in the drywall for the receptacle boxes. I use the blue plastic "old-work" boxes. I like these since you don't have to hit a stud to install them securely. If I had a flexible bit, I could have then inserted it into the cavity and using the accompanying in the wall guide tool, drilled a hole through the sill and into the crawlspace. Once in the crawl space, I could have attached my phone wire to the fish eye and pulled it back up effortlessly. Instead, I was relegated to the "tapping" technique, where I would crawl under the house and "tap" the sill with a screw driver and holler up to my wife..."Is that close?" Then cross my fingers and drill away. Then, worse still, I had to thread six or eight feet of cable up through the hole, return inside and fish it out with a coat hanger. Easier said than done. What should have been a twenty minute phone relocation took about two hours. I ordered the fish-bit the next day. Fifty dollars well spent if you ask me, I'm going to use it and my new recessed light hole saw this weekend. I'll update you on the time savings delta. It should easily be enough to pay for the tools on just one project.

Monday, January 22, 2007

The Galley Gallery

The original galley kitchen in our cottage was less than spectacular. I don't know how it ever really functioned as a kitchen. It was dark and dank, and lacked an effective work triangle. When we set out to redesign the layout, we had no preconceptions of what we wanted...we only knew what we didn't like. We didn't like our kitchen. We also had no second thoughts about ripping out the old kitchen. There was nothing original there, in fact the current kitchen was added sometime in the 1980's. The original kitchen was in what is now our living room. We started by removing the old sink basin, which covered half of the window, something that just seemed very odd to me. I thought about re-doing the kitchen in that configuration, but nothing I put on paper seemed to work. We took the drastic step of simply measuring out the exterior walls and starting with a blank slate. That helped tremendously, since we were able to let our imagination have go at it. What we ended up with was a very functional kitchen that we enjoy every day. It just works very well. We relocated the laundry to the former kitchen area, and removed the existing laundry room to create the kitchen and eat in island. We built the entire space from scratch, well mostly. The kitchen cabinets were off-the shelf unfinished oak from Lowe's. We wanted the painted and distressed french country Kraft-Maid versions, but our budget just simply would not allow for the $16 thousand dollar investment. We experimented with a paint treatment and what we came up with was very convincing. They look amazing. With the embellishments and crown mouldings, they look remarkably similar to their $16 thousand dollar cousins, but with a $2000 dollar price tag.


Before...

and After...
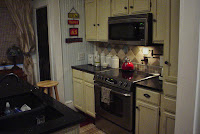

I'll post the entire series of pictures from demolition to reconstruction. A quick note, the paint finish was a three step process. The cabinets were first slightly distressed. Then, a base coat layer of white primer was applied to seal the bare wood. In the next step, a confederate grey-blue color was applied. The finish coat was a french country butter cream color. After the units had fully dried we sanded the top coat down slightly in the areas where one might normally find extensive wear over time...around the pulls, the door edges, etc. To add to the aged appearance, the entire cabinet was wiped down with a colonial American stain, which enhances the sanded areas and distressed points, which in our case were generally "worm holes" that we added with a nail punch. The worm hole effect turned out very nicely once stained. The stain also added a very convincing glow, which is what drew us to the original Kraft-Maids. After a week or so dry time, two coats of clear satin acrylic finished off the doors and facing. We took a smaller door to Lowe's to compare it to the more expensive variety...The verdict? Side by side comparison proved that the finish applied in a controlled environment was better, but not $14 thousand dollars better. Even the kitchen and bath associates were impressed with the level of detail we were able to achieve. Of all the projects to date, the kitchen was the most rewarding, and the one we're most proud of. Let the photos tell the story (I took some with my phone, so you'll have to excuse the poor quality)

Thursday, January 18, 2007

Bell Capital Cup Memories


Over the Christmas Holidays my sons youth hockey team competed in the worlds largest organized tournament in Ottawa Canada, rather successfully too. Out of a total of 510 teams from around the world, the boys finished in second place in the Pee-Wee Majors single A division. Not bad for a team from South Carolina aye? check it out here...